Prevent ring damage and range problems by following these tips.
Many shooters think scope mounting is simple. Just tighten a few screws, and the job is done, right? Well, there’s a little more to it than that.
All too often, a new scope runs out of clicks before bullet holes appear anywhere near the center of the target. And sometimes the adjustments act unpredictably.
Occasionally a new scope is defective, but more often the problem can be traced to one of the two most common mistakes in scope mounting.
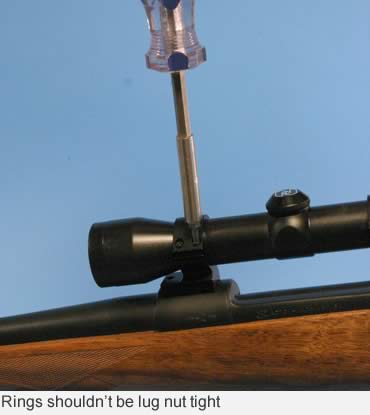
The most common one is overtightening the ring screws. All of the screws on a scope mount should be tight, but cranking hard on the scope rings does more harm than good.
A typical hunting scope is a collection of relatively delicate parts inside a thin aluminum tube. Tighten the ring screws like you would the lug nuts on a pickup, and the rings can literally crush the tube.
How much tightening is too much? The Talley scope mount company recommends 15 to 20 inch-pounds of torque on its ring screws. I can apply this much while holding a standard screwdriver with the thumb and first two fingers of my right hand (this was tested with the very accurate Brownells Mag-Tip Torque Handle).
Overtightening is the reason Talley provides a small Torx wrench with each set of rings. This wrench is small enough that the ring screws can’t be torqued too much.
Many people blame the rings for putting ring marks on their scopes, but unless something else is wrong, this won’t happen. Sometimes the problem is a scope tube that doesn’t actually measure 1 inch or 30mm. Scope tubes that are slightly oversized or undersized are likely to be marked by rings. With oversize tubes, the rings are too tight even before the screws are torqued. Undersize tubes leave ring marks when the scope shifts during recoil, whereupon the owner cranks down harder on the ring screws!
 One solution for slightly oversize scopes is lapping or reaming the rings. Ring reaming should be done the same way case necks are turned during handloading: Remove only as much metal as necessary. This means just enough steel or aluminum to allow the scope to be mounted without stressing the scope tube.
Reaming is quicker than lapping, but many people take the process too far. I have a Dave Manson 1-inch ring reamer, but use it only in extreme cases. Afterward, I lap the rings a little to knock off any sharp edges before mounting the scope.
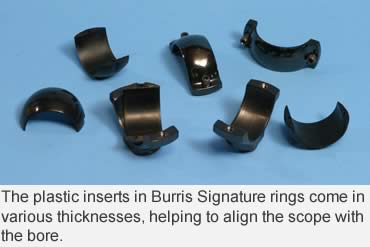
Another solution is a set of Burris Signature rings with plastic inserts that prevent ring marks.
Another common problem in scope mounting is the scope not lining up with the bore. Many commercial actions are imperfectly polished at the factory, resulting in a top surface that’s out of kilter with the barrel.
With uneven polishing, the scope mounts might even tilt slightly to one side. Sometimes, the barrel threads are a little crooked, but that’s actually less common than the top of the action being imperfect.
A lot of scopes get blamed for adjustment problems that are actually caused by misaligned mounting.
The trick is recognizing the problem in the first place. This requires mounting the scope with the reticle centered in the adjustments, and then seeing if the reticle lines up with the bore.
Scope adjustments work more accurately near the center of their range. This also gives the shooter as wide an adjustment range as possible.
There are two ways to center the reticle. The first is to turn the adjustments all the way in until they stop, then turn them all the way out, counting the number of turns. Finally, turn back the adjustment dial half that number of turns.
The other method is to place the objective bell of the scope flat against a mirror, then look into the scope. You’ll see the reticle itself, plus a separate image of the reticle reflected from the mirror. Theoretically, if the scope is adjusted so the pair of reticles line up perfectly with each other, the scope’s adjustments will be centered.
 I prefer the mechanical method because the second one assumes that the front of the objective bell is perfectly square to the axis of the scope. This isn’t always true, especially if the optics and reticle of the scope aren’t perfectly lined up with the center of the scope tube. This occurs more than once in a while, particularly with “affordable” scopes.
With the scope mounted and the adjustments centered, we now check to see if the reticle lines up with the rifle’s bore. This can be done either with a collimator or by bore-sighting.
I used to have my workbench set up so that a rifle could be bore-sighted on a neighboring object, but my present workspace doesn’t allow that. Plus, lever, pump and semi-auto rifles don’t allow bore-sighting, so now I use a collimator almost exclusively. If you plan to do all your own scope mounting, a collimator is an almost essential investment.
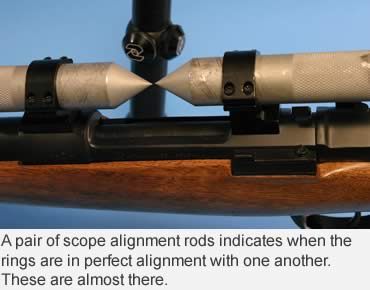
A pair of scope alignment rods can help, too. When mounted in the rings with their ends touching each other, the rods indicate whether the rings are perfectly aligned with each other and the top of the action.
This is another reason for Burris Signature rings. The plastic inserts come in half rings, some thicker than the others, marked to designate their sizes. If a centered reticle, for instance, points higher than the center of the bore, a +10 insert into the rear ring, and a -10 insert into the front ring might correct the problem.
People not using Signature rings have to figure out some other way to correct the elevation misalignment. I’ve tried a number of fixes and have even stooped to using duct tape inside rings. But the classic solution is to place shims under the bases. This works, but if the rifle is going to be shot “hot” very often (such as when prairie dog hunting), the shims should be made of the same metal used in the base, so there are no problems with uneven heat expansion.
 For big-game rifles that are shot only once or twice in the field, aluminum shims work fine, even with steel bases. I often cut shims from empty beverage cans, but steel shims work better with steel bases on any rifle that might get warm.
The classic Redfield-type mount, with two opposing screws on the rear base, is a simple solution to windage misalignment. Burris Signature rings come in this form.
The big problem with Redfield-type mounts is that the scope is only held firmly on the rifle by the ring in the front base. Any rifle with more recoil than a .30-06 will often cause the rear ring to shift inside the opposing windage screws.
Conetrol mounts are quite strong and have windage adjustments in both front and rear rings. They work especially well on hard-kicking rifles that need windage adjustment.
Another trick is to file a shallow lengthwise groove along the center of the underside of the base, ensuring that the sides of the base firmly contact the top of the action. Sometimes the bases contact only the action along the screw holes, preventing the bases from firmly supporting the scope.
Before going to all the trouble of shimming and adjusting mounts, open the bolt to make sure it has enough room to operate freely. Getting the scope lined up with the bore, only to find the scope is too low for the action to work, is very frustrating.
This might all seem like a lot of work when all you really want to do is mount a scope on your new rifle and head to the range. In the long run, though, proper scope mounting prevents many range problems by allowing your scope to function the way it was designed.
Read More Articles by John Barsness:
• Troubles with Choke Tubes: All sorts of things prevent shotgun chokes from doing what we expect of them.
• The .30-06 Just Plain Works: Many of us know intellectually that the .30-06 is a good all-around big game cartridge, but explanations are not experience.
This article was published in the July 2010 edition of Buckmasters GunHunter Magazine. Subscribe today to have GunHunter delivered to your home.