By J. Wayne Fears
A penny pincher’s guide to zeroing a scoped hunting gun.
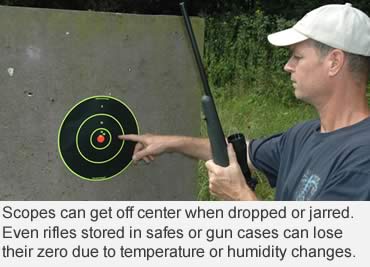
Riflescopes are sensitive optical instruments. Just sitting in a gun safe during the off-season can result in the crosshairs moving due to temperature or other environmental changes. The vibration of a commercial airliner can likewise jar a reticle off, even though the rifle is in a padded, hard-sided gun case. A rough ride to your hunting camp or to your stand in a truck or ATV can change your reticle’s position as well.
Regardless how much you paid for your scope or how well you protect it on your journeys, it will need to be resighted.
Be it centerfire or rimfire, sighting-in a scoped hunting gun should be at least an annual affair. Even if the rifle has been sitting a gun vault untouched, a range session is good insurance. Riflescopes sometimes drift off during long periods of storage.
Zeroing a riflescope can be a fun, economical event or a punishing shooting marathon. It all depends upon your sight-in technique.
Back when I was a hunting outfitter, it wasn’t uncommon to see clients take a large cardboard box to a safe shooting area and shoot an entire box of cartridges at the target, enduring lots of recoil in the process. When the hunters finally hit the box, they were ready to quit. Even worse, many were satisfied with a gun that was far from ready for serious hunting.
Considering the cost of the hunts and that once-in-a-lifetime shots were often involved, I never really understood this.
Properly sighting-in a rifle is even more important these days, considering the price and scarcity of certain types of ammunition.
Noted shooting authority Jim Carmichel once wrote, “Don’t wait until the last minute to do your sighting-in. This is the single most important step in your hunting preparation, so do it early, take your time and do it right.” This is good advice.
The following step-by-step sight-in method was taught by me by the late great gun writer Grits Gresham many years ago. It works, and should help anyone sight-in their hunting rifle with six shots or less.
 1) Have a steady rest
The equipment you will need includes a sturdy, recoil-absorbing rifle rest, a coin or screwdriver that fits your scope’s adjustment dials, a bore sighter, a good set of hearing protectors, a pair of shooting glasses and a supply of sight-in targets.
2) Get It on Paper
Before going to the range, use a bore sighter to adjust your scope’s crosshairs. Tyro shooters sometimes think this is the same thing as sighting in. Not so. It simply ensures that the shots will be on paper at 100 yards. This step can save you a lot of frustration on the range. Be sure to take the bore sighter to the range with you, as you might need it again.
3) Use the right ammo
Be sure to take the same ammunition with you to the range to sight-in your rifle as you are going to use on hunts.
Many years ago, to save money on ammo, I used some hard ball military ammo in my .30-06 rifle. Those military rounds didn’t shoot anywhere near the hunting ammo I’d used to zero my rifle, and I missed an outstanding buck as a result.

4) Establish where the rifle is hitting before making any adjustments
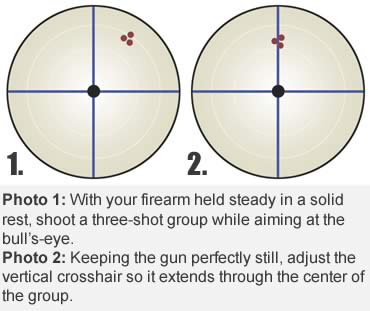
At the range, shoot a carefully aimed three-shot group at a 100-yard target without stopping to study where each shot hits. Aim for a small point on the bull’s-eye. This is important, as all adjustments of your crosshairs will depend on it.
5) Make Adjustments From the Bull’s-eye to the Group Center
Now that you’ve fired a three-shot group, get a shooting partner to help you. While holding the rifle steady in a rest or on sandbags, place the center of the crosshairs in the middle of the target, exactly where you held for the previous three shots.
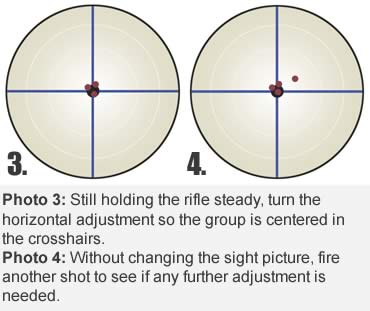
Have your partner adjust the vertical crosshair so it’s in the center of the three-shot group. Next, move the horizontal crosshair until it is in the center of the group. It is a must that the rifle be held securely, without moving, during these adjustments. Basically, all you are doing is moving the aiming point from the bull’s-eye to the center of the group.
Write down “move crosshairs from the bull’s-eye to the center of the three-shot group.” It is easy to forget and reverse the adjustment, as I have done many times, and that makes the distance the rifle is shooting twice as far off as it originally was. I have it written on my range house wall so that all can remember it.
 6) All Crosshair Adjustments Should be From the Bull’s-eye to the Bullet Hole
Check your adjustment by shooting at the center of the bulls-eye. The shot should be much closer, or if you are lucky, almost exactly where you aimed. Make the slight adjustment of the crosshairs just as before, from the bull’s-eye to the bullet hole.
If you still aren’t hitting at the point of aim, shoot a fifth shot and make another slight adjustment in the same way. By the sixth shot, your rifle should be hitting where you aim.
If you want to adjust your rifle for long-range shooting, such as 2 inches high at 100 yards and dead-on at 200 yards, it will be easy from this point.
This sight-in method works when done correctly. Then, when you miss a trophy buck on opening morning or you can’t hit a squirrel in the top of a hickory tree, you’ll know who to blame: you or the rifle.
This article was published in the July 2009 edition of Buckmasters GunHunter Magazine. Subscribe today to have GunHunter delivered to your home.