By P.J. Reilly
How treestand height affects impact points and shot angles.
It’s no secret that bowhunters love hanging out in the trees. Ground blinds have been gaining popularity in recent years, but treestands are still the go-to setup for bowhunters.
Elevation helps you see farther and reduces the chance of a buck spotting you, but other things are different, too.
Your sight pins are no longer dead on, and angles get challenging. Also, different heights create different conditions.
That is to say, shots from a stand 20 feet up a tree are not the same as those from 15 feet.
If you’ve been around the bowhunting game awhile, you’ve probably heard this. But what do the differences look like in black and white?
Should you always let a deer come closer? How is your aim affected the higher you go in a tree?
Since we all have freezers to fill and there’s always more room on the wall for big racks, we set out to answer those questions.
THE TOOLS
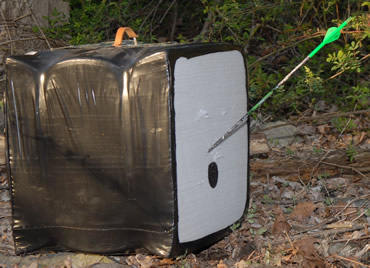
For our test, I used a Mathews Creed with a 70-pound draw weight. I shot a set of 5575, Gold Tip XT Hunter arrows, color-coded for different heights. The white wrapped and fletched arrows were shot from 15 feet high, the green from 20 feet, and the red from 25.
My setup produces arrow speeds of 305 fps. I set the sight pins on level ground for 20, 30, 40 and 50 yards. Shots at 10 yards were dead on with my 20-yard pin.
I used a Summit Viper Elite SD climber to scale a tree. From three different heights measured from the platform to the ground, I slung arrows into a standard Block target placed 10, 20 and 30 yards away from the base of the tree. The target was leveled for each shot to make sure any changes in impact angle were the result of height differences and not uneven ground.
The X factor in the experiment was me. I don’t have the means to get a Hooter Shooter or some other mechanical device up a tree, so we had to rely on my shooting skills.
I’m no Randy Hendrix, the 2012 Buckmasters Top Bow World Champion, but I’m no slouch. I took a couple of shots from each distance and height until I fired an arrow that felt good and hit in the spot where previous shots were grouping. That’s the shot that was recorded for the test.
THE SHOTS
Not surprisingly, all of my arrows from the treestand hit high of my aiming points. That’s to be expected when shooting from an elevated position with sight pins set at ground level. The effect of gravity is less when you shoot at a downward angle than it is when shooting across level ground. That difference in shot placement is the leading reason many rangefinder manufacturers offer models that include technology to account for shooting from treestands.
In rangefinders equipped with the angle compensation technology, hunters range a target from a treestand, and the distance is displayed as shooting distance, rather than line-of-sight distance. That is, a target that’s 20 yards away will be identified as being between 15 and 18 yards.
At one time, pendulum sights were popular. As an archer bent over to shoot toward the ground from a treestand, the sight would swing out to account for the downward angle. The net result was that pins set at ground level would swing to a spot higher than the ground position for shots from treestands. So an archer shooting from a treestand at a target 20 yards out could use the 20-yard sight pin, regardless of the downward angle. They worked well, but you don’t see those sights on the market anymore. That fad has passed.
Back to the shooting test. Standing on my treestand 15 feet off the ground, my arrows struck the target 2 inches high at 10 yards, 1 1/4 inches high at 20 yards and 2 inches high at 30 yards.
From a height of 20 feet, my arrows hit 2 1/2 inches high at 10 yards, 2 3/8 inches high at 20 yards and 3 1/4 inches high at 30 yards.
At 25 feet, my arrows hit 2 1/4 inches high at 10 yards, 2 3/8 inches high at 20 yards and 2 5/8 inches high at 30 yards.
Each point of impact was measured from the center of the bullseye to the bottom of the arrow. My bullseye was a black circle roughly the size of a soda can top.
I was surprised how little difference there was when shooting from the various heights. I was off the mark by a low of 1 1/4 inches to a high of 3 1/4 inches, but most shots fell in the 2-inch range. Shooting at a deer with a kill zone roughly the size of a 9-inch dinner plate, I’m going to be in the boiler room no matter what.
One reason the angle effect was minimal is the efficiency of today’s bows. The 305 fps I’m getting from my Creed means I have a very flat-shooting setup. Bows that produce slower speeds are going to see more disparity, because the arc is greater.
If you’re shooting under 280 fps, I suggest duplicating this experiment to see where your arrows hit at various distances. You might not need to compensate, but the time to find out isn’t when you’ve just shot over the biggest buck of your life.
 THE ANGLES
The biggest eye-opener for me in the shooting test was the difference in impact angle from the various distances.
Because an arrow kills by causing hemorrhage instead of shock, bowhunters need to send an arrow through as many of a deer’s vital organs as possible. A double-lung shot is best, with a heart shot a close second. Liver and gut shots are fatal, but blood trails from such shots are sparse, and the animal takes much longer to succumb to the wounds. Always target the lungs.
And notice we’re talking about lungs in the plural. A single-lung shot is fatal, but it can take a very long time for the deer to expire. A whitetail hit in one lung can travel a long way before it dies, making tracking and recovery a nightmare.
The best angle for an arrow to strike a deer’s lungs is 90 degrees. A whitetail’s heart and lungs sit inside its chest cavity, with the lungs parallel to one another, directly behind each shoulder. Low and forward in the space between the lungs is the heart. On flat ground, you can easily pierce both lungs or the heart (and sometimes all three) with one arrow.
Elevate your shooting position, however, and it becomes increasingly more likely to hit one lung and nothing else. Bowhunters have to account for elevation by aiming higher on a deer’s body than they would at level ground.
The goal is for the arrow to enter the chest cavity at an angle that allows it to pass through the top of the near side lung and the bottom of the lung on the other side of the body cavity.
In our shooting test, the shot from 15 feet high at the target 30 yards distant produced the angle closest to 90 degrees. That arrow hit the target nearly parallel to the ground.
The arrow angle from the 30-yard shot at 20 feet high was a little steeper, and the 30-yard shot at 25 feet high was steeper yet. But all three 30-yard shots produced angles that easily could result in double-lung hits.
At 20 yards and 10 yards, that wasn’t always the case.
A 45-degree angle is about as steep as you can go to expect to hit both lungs. Looking at the side of a target standing on flat ground, a 45-degree angle would mean your arrow would protrude from the face exactly halfway between parallel (90 degrees) with the ground and straight up and down (0 degrees).
Shooting from 15 feet off the ground, the angle of the 20-yard shot was well above 45 degrees, while the 10-yard shot was right around 45 degrees – both within the comfort zone.
At 20 feet high, the 20-yard shot was a little above 45 degrees, while the 10-yard shot was a hair below 45 degrees. And at 25 feet high, the 20-yard shot was right at 45 degrees, while the 10-yard shot was substantially steeper.
What does that tell you? It means if you like hunting from a stand 25 feet off the ground, you have a better chance to score a double-lung hit if you shoot from 20 to 30 yards away than from 10 yards. At 20 feet, your best bet is to look for shot opportunities at 15 yards and farther.
You could ignore the angle and try to hit the heart, but remember your bullseye just went from the size of a paper plate to the size of an apple. I like a little more margin for error when shooting at a live animal from a small platform with adrenaline rushing through my body.
CONCLUSION
There is plenty of science that goes into producing the perfect killing shot with a bow and arrow. Fortunately, it’s an easy formula to figure out, and you don’t have to use a pencil or add numbers.
Shoot from a treestand and find the distance that produces a minimum of a 45-degree shot angle, and make sure you don’t shoot at a deer closer than that.
They say bowhunting is a game of inches, but it’s also a game of patience. Wait for the right shot and you’ll enjoy short, fulfilling blood trails and a full freezer.
Read Recent Articles:
• Big Deuce: Two brothers, two arrows and one very big buck.
• Become a Buck Profiler: Because good deer hunters don’t have to be politically correct.
• It’s in the Genes: Are whitetails from Florida really the same as those from Saskatchewan?
This article was published in the October 2013 edition of Buckmasters Whitetail Magazine. Subscribe today to have Buckmasters delivered to your home.