How to get more from your trail cameras than just pictures.
I’d been holding out for a big, mature buck with my bow, but when I still hadn’t put a tag on one by the close of the firearms season, I knew I had to make a move.
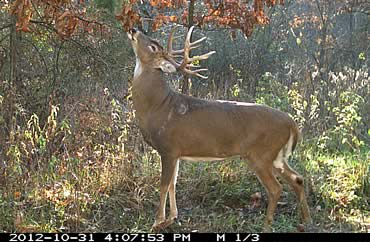
I had several trail cameras out and decided to swap out the memory cards and let the pictures tell their story. If there was a big buck making regular daylight appearances on any of the cameras, that deer would be my huckleberry.
Sure enough, I found a candidate.
With the rut over and their focus back on food, a big buck and a spike were showing up regularly on a narrow food plot.
All I had to do was slip in and get a stand in place. Luckily, the breezy conditions would cover the noise and carry my scent in a safe direction.
Making quick work of the stand, I finished with enough time to go home, shower and be back in the stand with three hours of shooting light remaining.
The wind that had been so helpful earlier seemed to be working against me. I feared it was way too stiff to encourage deer movement.
I’d no more than convinced myself the day was going to be a bust when I spotted the spike. Still, he was young and foolish. What were the odds his older brother would be with him?
It turns out they were pretty good.
I drew my bow just as the big buck stepped into a shooting window. I picked out a hair on its vitals, settled the pin and sent a Rage-tipped Easton on its way.
Within two bounds, the buck was bouncing off trees like a pinball. The tracking job was short, easy and sweet.
That last bow buck from 2012 was one of the easiest hunts I’ve ever had. I’d be lying if I said it was always that easy, but there’s no doubt trail cameras can make a big difference.
Without trail cameras, I’d have had no idea that buck was visiting the food plot. In fact, the last pictures I’d gotten of him were from another food plot on the other side of the property.
Used properly, trail cameras can make your hunt. Used carelessly, they can hurt as much as they help.
What follows is some advice on how to maximize the benefits of trail cameras and minimize the negatives.
HEAR NO EVIL
The first consideration in using a trail camera effectively is to make sure it doesn’t spook the very deer you’re hoping to see and hunt.
Having used cameras since the first days of Trail Master’s two-unit system, I can testify how far the technology has come, particularly in the last few years. The overall quality has jumped considerably while prices have dropped.
That said, there are still too many units that make noise.
We could debate whether various forms of flash spook deer. My experience has been that most deer aren’t bothered by flash, but a few are. Even a few is too many for me, but it’s a legitimate debate.
When it comes to noise, I know loud cameras spook deer.
Before you place a trail camera in the woods, test it in a quiet room. Listen for noise during all its various workings, including when it comes out of battery saver mode and when it switches between daytime and night mode. If it makes noise, I refuse to use it.
If you’re stuck with a noisy camera, you can minimize the disturbance factor by placing it about 10 feet off the ground, angled down to the coverage area and set on single-shot mode. That also helps minimize flash disturbance. In both cases, a single Click! and Flash! from above is far superior to a series.
SMELL NO EVIL
Scent is another important factor, both with the camera and the operator.
I’m shocked how many scent-conscious hunters head to the woods to put out an untreated trail camera with bare, unwashed hands.
The human odor from handling the camera will linger up to three days, while material and factory related scents can last even longer. Use a scent-killing spray on your trail camera just like you should on the rest of your hunting gear.
When it comes to your scent, wearing a carbon suit to place cameras might sound like overkill, but at least take a shower with scent-free soap and wear rubber boots and clothing washed in unscented detergent.
Treat every camera location like a stand setup.
Avoid high-risk locations like bedding areas, and take care getting in and out, just as you would when hunting. If you can’t place or check a camera without spooking the deer you hope to hunt, what’s the point of using one?
Also, plan camera visits for the late morning hours when deer activity is usually low.
Finally, don’t linger at the camera site. Get two memory cards for each camera so you can swap the cards and get out.
If you like to use a handheld photo viewer, look at the pictures later. Remaining at the camera site leaves more scent and increases the chances you’ll spook deer.
 MORE THAN PICTURES
Mineral sites, bait piles, water holes, food sources, scrapes, trails and funnels are productive locations for trail cameras.
Where legal, mineral sites and feeders generate an almost unfair number of pictures. They’re also better choices for noisy cameras since deer seem to tolerate more disturbance at such locations.
But what good are thousands of photos, many of which contain the same deer?
If you want to know more about the makeup of your local deer herd, those numerous and repetitive photos can be invaluable.
Even on the largest properties, you can get an amazingly accurate census of deer living there by dividing it into 100-acre sections and establishing a mineral lick or bait pile in each. Covering each bait site with a trail camera provides census data accurate enough that biologists often use this method.
The scientists mostly use corn piles, but I’ve found mineral sites to be effective, assuming the census is taken during the spring or summer.
Run a camera 14 days on each established bait site. Next, pull the cards and start counting deer. Either on paper or on a computer spread sheet, document the total number of pictures of bucks over 1 year old (including repeats), total does and total fawns.
Next, go through the buck pictures and determine the number individual bucks over 1 year old.
By comparing the number of individual bucks over 1 year old to the total number of times those bucks were captured on camera, you get a ratio to apply to the doe and fawn numbers.
For example, if you got 100 total buck pictures consisting of 10 individual bucks, you would have a 10:1 ratio or 10 percent.
It’s fairly safe to apply that same ratio to your doe and fawn totals. So, if you had 10 individual bucks with 300 doe pictures and 200 fawn pictures, your approximate deer population would consist of 10 bucks, 30 does and 20 fawns.
Biologists estimate it’s likely to miss about 10 percent of the deer in such a census, so you could factor that in and come up with 11 bucks, 33 does and 22 fawns.
Knowing your herd will help you establish realistic harvest goals, as well as monitor your management progress over several years.
Where feeding and baiting are prohibited, place cameras on identifiable food sources and watering holes. Census data from such sites is much less accurate, however.
Buckmasters Editor Ken Piper uses trail cameras over summer feeders for a related reason.
“There’s a good bit of debate about when the rut takes place here in central Alabama,” Piper said. “I like to keep a trail camera at a feeder throughout the summer to monitor the birthing times of the does.
“You will see them get heavier and heavier with pregnancy until they disappear for a few days. Then they’ll show up skinny once again. That’s how I know they’ve had their fawns. Counting back 200 days, I can guess with decent accuracy when those does were bred.”
That kind of hands-on knowledge can help you plan your hunting strategy. If you know when breeding takes place, you can plan to hunt various stands based on where you think deer will be during the pre-rut, rut and post-rut.
Even in the Northeast and Midwest where fawns are born in the spring and there’s an abundance of lush new plant growth available, whitetails will come to corn in a feeder or bait pile.
SCRAPES and CAMERAS
During hunting season, I move cameras to scrapes around food sources. I choose camera setups where I can get in and get out with the least amount of disturbance.
The trick is to cover as many active scrapes as possible. You’d be surprised how often a buck will consistently visit only one of two scrapes within spitting distance of each other.
If you hunt the wrong one, you might never see him. Since most of us have only a few cameras, shift them once a week. Camera rotation is another reason I choose easily accessible locations.
I feel so strongly about it, I create scrapes I can access if natural ones don’t exist. Mock scrapes are a regular part of my fall arsenal, and I’ll even “plant” a scrape tree if I have to.
Planting scrape trees is a great way to get bucks to visit one spot in a food source. They also lure bucks within bow range on larger food sources.
The first step in planting a scrape tree is to find one that will work. Look for a tree with the diameter of a soda can or a little larger that offers a licking branch at nose level, taking into account you’ll need to bury the trunk about 3 feet into the ground. It helps to select a tree species the local deer use frequently.
After cutting off the tree at the base, use a post hole digger to create a 3-foot hole and place the tree in it.
If you’re hunting near a stand, point the licking branch toward the stand. Doing so will encourage good shot angles with the buck facing away from you.
Pack the loose dirt around the tree until it’s solid. Next, cut any branches that interfere with the licking branch to make it stand out more.
If you have a quiet, LED or no-flash camera, place it directly on the scrape tree.
Create a mock scrape under the licking branch and then back out and give the area some time. Continue to hunt other stands, but check your camera every week or so to see if you’ve picked up any worthy bucks.
CONCLUSION
While I didn’t go into details on camera placement techniques, that wasn’t an accident. I wanted to share things you might not have read in other articles, and make you think about ways to get more from your camera than pictures.
After all, the real value of trail cameras isn’t the pictures they produce. It’s the knowledge we gain when we use them.
Read Recent Articles:
• Management Makeover: Biologists face new challenges as herd dynamics change.
• The Deer Doctors: New studies examine predator impact, protein effect and more.
• Raise Your Rattling IQ: Ph.D. applies some science to the mystery of antler rattling.
This article was published in the September 2013 edition of Buckmasters Whitetail Magazine. Subscribe today to have Buckmasters delivered to your home.