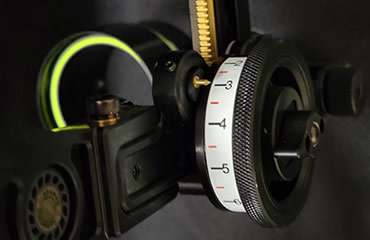
Single-pin sights need a good tape for dead-on accuracy.
The Tip of the Week isn’t about endorsing products, but I can’t help mentioning some product names this week. The information, however, applies to similar products, so you can use it with other brands than the ones I mention.
So, with that caveat aside, here goes:
It’s starting to feel like spring here in Alabama, so I’m finally getting around to setting up the new Mathews V3X I got in January. One of the new features of the bow is a cutout in the riser in which you can install a dovetail-type sight. The advantage of having the sight mount directly into the riser is better balance, and the ability to move the quiver in tighter to the bow. I’m all for anything that makes my bow wobble less in my hand, but that meant getting a new sight since I don’t own a dovetail model.
I should also mention I use a single-pin moveable sight. My aging eyes love the clarity and simplicity of the single-pin design, and the vertical stance of the pin helps me stay on track left and right. If you haven’t considered using just one pin, give it some thought. With today’s fast bows, you can likely use that one pin out to 30 yards and never touch the adjustment wheel. Also note that more than 80% of all the bucks in the record books were taken under that distance.
I wanted to stick with that design, so the folks at HHA sent me their new Dovetail Tetra Max. It fits Mathews’ Bridge Lock feature and accommodates the closer quiver by moving the adjustment wheel forward. It installed easily and fit great ... and then I remembered I’d have to go through the process of selecting the correct sight tape.
Having to use a sight tape is the only real disadvantage I’ve encountered using single-pin, wheel-adjustable sights. When you get the tape right, you can dial those sights to the exact yard if you so desire. The trick is getting the exact right tape.
HHA has a great system in that their sight comes with a setup tape installed. You shoot your bow at 20 yards and 60 yards, noting the location of the dial at each distance. The gap tells you exactly which of the included tapes to put on, and it will be accurate to the yard if you do it correctly. And it’s not complicated.
The only problem is I can’t hold a group tighter than a pie plate at 60 yards. Yes, most of my arrows are tighter than that, but I get fliers that aren’t the fault of the equipment. In short, I can’t trust my shooting at 60 yards to accurately determine the correct tape.
That doesn’t mean I can’t get the best tape for my setup, though. I trust my groups out to 50, so I shoot my bow at 20 and 50. The resulting recommended tape is a little tighter than my actual gap, so I skip up a few tapes larger and try that.
Next, I shoot, shoot and shoot some more. What you’ll find is the difference between one tape and another is so small that it takes a lot of shooting to say for sure you have the exact right one. I’ve often started off with one tape in the spring only to adjust up or down a few sizes by the time I was shooting regularly and more reliably.
On another note, I don’t use the tapes included with the sight for hunting. I use the correct included tape to make my own that have bold lines every five yards instead of every yard like the preprinted tapes. They also don’t have tiny numbers. I mark every other line with a large, single number to designate distance: 2, 3, 4 and 5 for 20, 30, 40 and 50 yards. The lines in between those (the half-distances of 25, 35 and 45 yards) are left blank. I print them on waterproof label paper you can get online, and pretty much everybody who sees them wants to know where to get one.
I guess I’m not the only one suffering from getting older!
Read Recent Tip of the Week:• Hot on the Trail: Tracking wounded deer is a skill you can improve with practice.


.png)